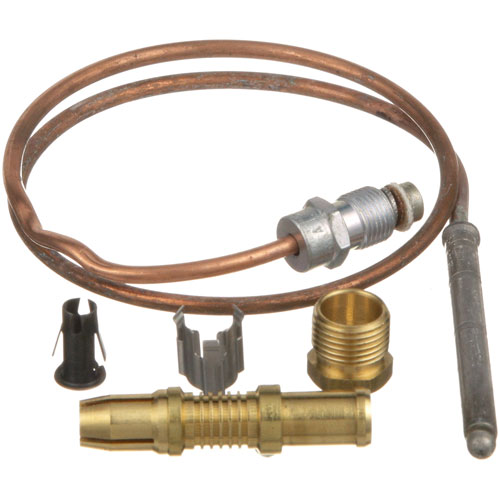
American Range A11100 Thermocouple 18" 20-30mV 1980 Series
Specifications:
- 1980 Series Snap Fit 18" Thermocouple, 20-30 Mv
- American Permanent Ware Griddle Ggm, Ggt
- Comstock Castle Oven Bake, Barbeque & Pizza Ovens.
- Series: C, D, F, K.
- Dynamic Cooking Systems Oven All
- Garland Broiler 6-40/50S, 7-40/50S, 8-40/50S, 60-40/50R
- Oven Series: H281, P280. Standard Oven From 03/99 In
- Canada Only, Range: G20-Sph
- Imperial Model?
- Star Fryer M14, Mi4 (D,Dl), M18, Mi8(D,Dl), M43, 215B, 216,
- 403 404
- Us Range Oven P-4-20.
- Wolf Oven Ch, Chssd, R
Description
Dimensions:
- Weight: 0.1 lbs
- Length: 5 in
- Height: 0.5 in
- Width: 4 in
AMERICAN RANGE:
10485 AMRA11100
ANETS:
ANEP8900-32 P8900-32
APW WYOTT:
GARLAND:
1019418 1029410 1307401 1415000 227002 227122 227183 4518817 G01575-1 GL1019418 GL1029410 GL1415000 GL227183 GLG01575-1
JADE RANGE:
SOUTHBEND:
STERO:
STA2J-6726 STA2J6726 STA6726 STAH456
TRI-STAR:
310210 TRS310210
U-LINE:
1980-018
Step1: Turn off the gas supply and disconnect power to the appliance.
Step2: Remove the old thermocouple from the pilot assembly.
Step3: Inspect the pilot bracket and gas fittings for wear or corrosion.
Step4: Insert the new thermocouple into the pilot flame bracket.
Step5: Secure it with the mounting screw provided.
Step6: Attach the thermocouple nut to the gas valve inlet.
Step7: Turn on gas and test the pilot flame to ensure proper detection.
Step8: Confirm the thermocouple shuts off gas when the flame goes out.
Customer Reviews
Write a Review
-
Easy to Install
This Thermocouple was just what I needed. It's strong, easy to set up, and provides perfect temperature control. I am very pleased with this product.
We strive to provide our customers with a hassle-free and efficient shopping experience. Our shipping policy ensures the timely delivery of your orders and complete customer satisfaction. View More
We are committed to ensuring your complete satisfaction with every purchase. We understand that circumstances may arise where you must return a product or request a refund. If for any reason you are not satisfied, you may return the item(s) according to the terms outlined below. View More
This Payment Policy outlines the terms and conditions governing all payments made for products purchased through our website. By making a purchase, you agree to be bound by this Payment Policy. View More