How to Replace a Moffat Oven Element Without Kitchen Downtime
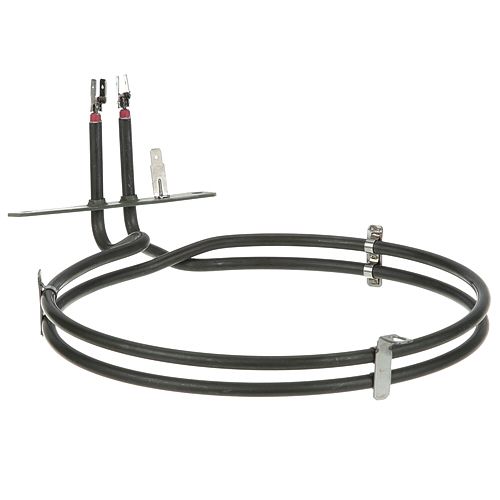
In a commercial kitchen, every minute matters. Equipment failures can disrupt service, compromise food quality, and reduce revenue. One of the most vital components in a commercial oven is the Moffat oven element, which delivers the consistent heat needed for reliable cooking. When it fails, productivity suffers. Knowing how to replace a Moffat oven element efficiently helps prevent costly downtime. With proper preparation, quality oven parts, and a clear process, kitchens can complete a Moffat oven element replacement quickly. This guide covers early warning signs, safe replacement steps, performance testing, and preventive maintenance to minimize future failures.
Signs Your Moffat Oven Element Needs Replacement
Identifying early oven element failure symptoms is essential for preventing cooking disruptions and avoiding potential safety hazards. Recognizing when a Moffat oven element replacement is needed can save time, reduce repair costs, and keep your appliance operating efficiently. Common warning signs include visible damage, reduced heating performance, unusual odors, or an element that does not glow properly.
Visual Signs of Damage: Always ensure the oven is switched off and fully cooled before inspecting any oven parts, especially the heating components.
-
No Red Glow: A properly functioning element should emit a bright orange or red light. Patchy illumination or no glow typically signals the need for oven element repair or full oven element replacement.
-
Cracks or Breaks: These indicate a damaged internal circuit and reduced heating capability.
-
Blisters or Bulges: Often caused by overheating and may lead to sudden failure.
-
Charring or Burn Marks: Dark spots suggest heat stress or electrical damage.
-
Sparks or Arcing: If the element sparks or shorts against the oven wall, discontinue use immediately and consider changing the element in the Moffat oven as soon as possible.
Performance and Odour Issues: Beyond physical damage, performance changes often reveal deeper problems within your oven elements.
-
Slow Heating or No Heat: Longer preheating times or failure to reach temperature often point to a defective element.
-
Uneven Cooking: A weakened element creates hot and cold spots, resulting in inconsistent cooking results.
-
Burning or Electrical Smells: Persistent acrid or plastic-like odors may signal insulation breakdown inside the element.
Other Potential Indicators
-
Tripped Circuit Breaker: A shorted element can overload the circuit and repeatedly trip the breaker.
-
Broiler Not Working: If the bake element functions but the broiler does not heat, the broil component likely requires replacement—another clear sign of failing oven parts.
Looking for reliable commercial kitchen equipment parts in Canada? Shop at PartsFe CA for high-quality oven elements, thermostats, ignitors, control boards, and more—built for durability and performance. Our wide inventory, fast Canada-wide shipping, and dependable support help minimize downtime and keep your commercial kitchen running efficiently.
Step-by-Step Process on How to Replace a Moffat Oven Element
Replacing a Moffat oven element is a manageable DIY repair that requires basic tools and proper safety precautions. Whether you are changing oven element components for the first time or performing routine maintenance, the process typically involves disconnecting power, removing the faulty unit, reconnecting wiring, and securing the new element correctly.
Preparation: Ensure you purchase compatible oven elements designed for your specific Moffat model to guarantee proper fit and performance.
Tools required:
-
Phillips or flat-head screwdriver
-
Needle-nose pliers (if needed)
-
1/4-inch nut driver (model dependent)
For safety, switch off the oven at the main circuit breaker and unplug it if possible before beginning any oven element repair.
Replacement Process
-
Remove Oven Racks: Take out all racks to access the back wall easily.
-
Locate and Unscrew the Element: The bake element is typically secured with two screws at the rear of the oven cavity. Remove them carefully.
-
Pull Forward Gently: Slide the element a few inches outward to expose the wire terminals without straining the wires.
-
Disconnect the Wires: Note the wiring setup (take a photo if needed) and detach the connectors. Secure the wires to prevent them from slipping inside the wall.
-
Install the New Element: Attach the wires to the new component using the same configuration, ensuring each connection is firm. This step is the core of changing the element in the Moffat oven correctly.
-
Secure the Element: Push it back into position, align it with the mounting holes, and fasten the screws tightly.
Final Step: Restore power and test the oven at a low temperature. The new element should glow evenly. A slight smell or light smoke during the first heating cycle is normal after oven element replacement.
Explore how to fix a broken heating element in a commercial oven, which explains how to identify element failure, follow safe replacement steps, and test the oven to restore proper heating performance In the below video.
How to Test the Moffat Oven Element for Proper Performance
To ensure your Moffat oven element is functioning correctly, perform both a visual inspection and a multimeter test. The table below outlines each diagnostic step in a structured format for quick reference.
|
Test Type |
Step |
What to Do |
Expected Result |
Interpretation |
|
Visual Inspection |
Check for Red Glow |
Turn the oven on and observe the element |
Bright, consistent orange/red glow |
If dark spots or no glow appear, the element is likely faulty |
|
Inspect for Physical Damage |
Turn oven off and let it cool; look for cracks, blisters, bulges, burn marks |
Smooth, intact surface |
Visible damage indicates replacement is needed |
|
|
Multimeter Test |
Ensure Safety |
Turn off the breaker and unplug the appliance |
No power supply |
Prevents electrical shock |
|
Access Terminals |
Remove racks, unscrew the mounting bracket, and gently pull the element forward |
Terminals visible |
Enables electrical testing |
|
|
Disconnect Wires |
Remove wires from terminals (secure them to avoid falling back) |
Wires separated safely |
Prevents interference during the test |
|
|
Set Multimeter |
Set to the lowest ohms (Ω), usually 200 Ω; touch probes together to calibrate |
Reading near 0 |
Confirms meter accuracy |
|
|
Test Resistance |
Place one probe on each terminal |
10–40 ohms (varies by model) |
Reading confirms the working element |
|
|
Faulty Reading |
Observe display |
OL, 1, or infinite reading |
Indicates a broken internal circuit |
|
|
Ground Fault Test |
Check for Short |
Set the meter to 1000 Ω+, and place one probe on the terminal and one on the bare oven body |
No continuity |
Any reading indicates short to ground |
After testing, reconnect all wires securely, reassemble the oven, restore power, and run a preheat cycle. If the element passes testing but heating issues persist, inspect other critical oven parts such as the thermostat, temperature sensor, or control board.
Check out how to troubleshoot and repair a Moffat oven in a commercial kitchen, which covers common faults, diagnostic procedures, repair steps, and maintenance tips to restore reliable oven performance.
Preventive Maintenance Tips to Avoid Future Moffat Oven Element Failures
You can reduce the likelihood of premature breakdowns by keeping your appliance clean, protecting the heating components, and monitoring usage habits. Proper care extends the lifespan of oven elements and minimizes the need for frequent oven element repair.
Maintenance and Usage Best Practices
-
Regular Cleaning: Grease and food residue can create hot spots that lead to overheating. Once the oven cools, wipe spills with a damp cloth and mild detergent, avoiding abrasive cleaners.
-
Avoid Self-Cleaning Function: The extreme temperatures generated during self-cleaning can strain heating components and increase the risk of oven element failure symptoms appearing sooner. Manual cleaning is often safer.
-
Prevent Physical Damage: Handle heavy cookware and racks carefully. Dropping items onto the element may cause cracks or internal faults that require changing the oven element units prematurely.
-
Ensure Proper Airflow: Do not overload the oven, and keep vents unobstructed to ensure even heat distribution and reduce stress on the element.
-
Avoid Using Foil on Racks: Lining the oven base or racks with foil can trap heat and interfere with circulation, increasing the risk of overheating.
-
Monitor Temperature and Use: Avoid prolonged use at maximum heat. An oven thermometer can help verify accurate temperatures and prevent thermal strain.
-
Protect from Power Surges: Electrical fluctuations may damage sensitive oven parts, so consider using a surge protector.
-
Regular Inspections: Check the element and wiring for burn marks, corrosion, or loose connections. Early detection allows for timely oven element replacement and helps maintain consistent performance.
Summary: Replacing a Moffat Oven Element Without Disrupting Kitchen Operations
Replacing a Moffat oven element is a fast and practical repair that can typically be completed in under 30 minutes, helping kitchens restore heat quickly and avoid service interruptions. Prioritizing safety, using the correct oven parts, and following a structured Moffat oven element replacement process ensures efficient performance without complicated repairs. With proper tools and preparation, changing the element in the Moffat oven becomes a manageable maintenance task that supports consistent cooking results and long-term equipment reliability.
Key Takeaways:
-
A faulty Moffat oven element can impact cooking consistency and lead to unexpected kitchen downtime.
-
Turning off the power at the main panel is essential before starting any oven element replacement.
-
Following a step-by-step process for changing oven element components ensures a safe and efficient repair.
-
Testing the oven after installation confirms proper heating and prevents future operational issues.
-
Keeping the correct replacement oven elements and basic tools on hand helps minimize disruptions and maintain productivity.
FAQs
How long does a typical Moffat oven element replacement take?
A standard Moffat oven element replacement usually takes under 30 minutes. With the correct oven elements, tools, and preparation, your oven can be ready for use shortly after changing the element in the Moffat oven.
Is it safe to use my oven if the element is only partially glowing or sparking?
No. These are clear oven element failure symptoms that suggest a short circuit or internal damage. Turn off the power immediately and proceed with an oven element replacement to prevent electrical hazards.
Do I need professional tools to replace the element myself?
No, changing oven element components is a simple DIY task. Basic tools like a screwdriver, nut driver, and needle-nose pliers are typically sufficient. A multimeter is optional but helpful if you want to know how to test an oven element before replacement.
|
Disclaimer: This blog is for informational purposes only. Always follow the manufacturer’s guidelines and disconnect power before attempting any oven repair. If you are uncertain, consult a qualified technician, as the author is not responsible for any damage or injury resulting from the use of this information. |