KitchenAid Immersion Blender Issues: Common Problems and Easy Fixes
A KitchenAid immersion blender is an essential handheld tool for creating silky soups, emulsified sauces, and smooth purées directly in the pot. However, even a high-quality KitchenAid immersion blender can experience operational setbacks over time. From motor stalling and blade decoupling to overheating and abnormal vibrations, understanding the mechanical root cause is critical for accurate troubleshooting.
In this guide, we will break down common KitchenAid immersion blender issues, explain why they occur, and provide structured, DIY-level corrective actions. You’ll also learn when sourcing KitchenAid spare parts makes sense—and when replacing the unit is more economical.
Understanding Your KitchenAid Immersion Blender and How It Works
A KitchenAid immersion blender is a versatile handheld appliance designed to blend, purée, and emulsify ingredients directly in a pot or bowl. Understanding its mechanical design and operating principles can help you maximize its performance and troubleshoot common issues.
Key Components: Understanding the core KitchenAid immersion blender parts helps you diagnose problems faster:
-
Motor Body: This main unit houses a powerful DC motor designed for quiet, long-life operation. It typically features an ergonomic, non-slip grip.
-
Blending Arm: This removable stainless steel shaft (often 8 inches or 20 cm) attaches to the motor body with a twist-lock mechanism.
-
Bell Blade Assembly: Located at the end of the blending arm, this 4-point stainless steel blade is covered by a guard to prevent splashing.
-
Variable Speed Trigger: Modern models use a trigger switch that provides greater control; the speed increases as you apply more pressure.
-
Pan Guard: A removable protective accessory that prevents scratching on non-stick cookware—one of the most useful KitchenAid immersion blender accessories.
How the Mechanism Works: When you activate the power button or trigger, the internal electric motor drives a shaft that rotates the cutting blades at high speeds. Unlike countertop blenders that rely on a vortex to bring food down to the base, an immersion blender is manually moved through the ingredients.
-
Direct Power Transfer: Commercial-quality couplers with interlocking teeth transfer motor power directly to the blade assembly.
-
Safety Features: Most models include a safety switch or thermal fuse. The thermal protector automatically shuts off the motor if it reaches high operating temperatures, requiring a 10-minute reset period.
-
Variable Speed Control: Higher speeds are used for pureeing and emulsifying, while lower speeds are ideal for gentler tasks like mixing pancake batter.
Operating Basics: If you’re researching how to use KitchenAid immersion blender models correctly, follow these core guidelines:
-
Submerge First: Always submerge the blade completely into the food before turning the power on to avoid splatters.
-
Angled Movement: For a smooth purée, hold the blender at a slight angle and move it slowly around the container.
-
Depth Limit: Only immerse the blender up to the seam of the blending attachment; never submerge the motor body in liquid.
Need reliable commercial kitchen appliance parts fast? Shop now at PartsFe CA for OEM and high-quality compatible parts, including blender components, heating elements, pumps, motors, switches, and more. We supply durable, performance-tested parts to restaurants and foodservice operations across Canada—helping reduce downtime and extend equipment lifespan.
Common KitchenAid Immersion Blender Problems and Easy Fixes
Even durable appliances develop performance irregularities. Below are the most frequent KitchenAid immersion blender issues and structured remedies.
Motor Suddenly Stops Working: If your blender shuts off during use, it is likely due to the thermal protection system.
-
The Cause: The motor has reached a high operating temperature or has become overloaded by heavy ingredients.
-
The Fix: Unplug the unit immediately and let it cool for at least 10–15 minutes. If the mixture is too thick, add more liquid to reduce the load on the motor.
Motor Runs but Blades Won’t Spin: This typically indicates a mechanical disconnect between the motor and the blending arm.
-
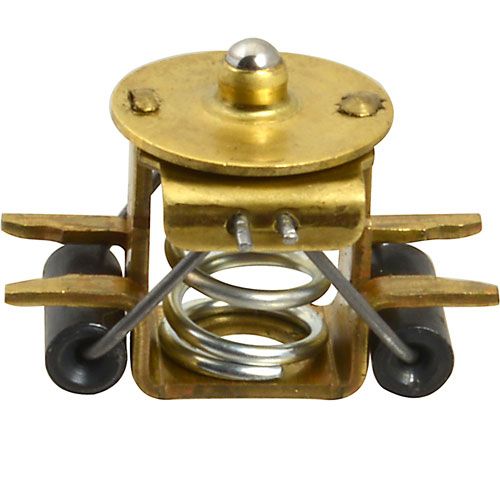
The Cause: A stripped drive coupler or an improperly seated blending arm.
-
The Fix: Ensure the blending arm is fully twisted into the locked position. If it is locked but still won't spin, inspect the plastic or rubber "teeth" in the motor socket; if they appear shaved or missing, the coupler may need replacement.
Stuck or Difficult-to-Remove Attachments: Food residue can act like glue, making it difficult to swap attachments.
-
The Cause: Dried food particles trapped in the twist-lock or button mechanism.
-
The Fix: Soak the joint (the connection point) in warm, soapy water for a few minutes to loosen the residue. Always rinse the blending arm immediately after use to prevent this buildup.
Grinding Noises or Vibrations: Unusual sounds during operation can signal internal wear.
-
The Cause: Worn blade bearings or a misaligned drive stud.
-
The Fix: Check the blade for ease of rotation by hand (while unplugged); it should turn slowly with slight resistance. If it feels loose or makes a gritty sound, the blade assembly may be failing and require a new blending arm.
Explore the Vitamix blender maintenance and troubleshooting guide, which shares quick care tips and fixes in the video below.
Repair vs Replacement: When Should You Replace Your KitchenAid Immersion Blender?
Deciding whether to repair or replace your KitchenAid immersion blender often comes down to the age of the unit, the cost of the specific part, and its warranty status. While these tools are built for longevity—often lasting 5 to 7 years with regular use—certain mechanical failures make replacement the more practical choice.
|
Issue / Condition |
When to Repair |
When to Replace |
|
Warranty Coverage |
If the unit is under KitchenAid’s 1-year full warranty (or up to 2 years for some commercial models), repairs or replacements are typically covered at no cost. |
If the warranty has expired and repair costs are high, replacement may be more economical. |
|
Attachments & Blades |
If the motor runs but the blades are dull, bent, or noisy, replacing the blending arm assembly ($25–$40) is cost-effective. |
If attachment damage is combined with motor or internal electrical failure, replacement is usually better. |
|
Minor Clogging/Trigger Issues |
A sticking trigger or locking mechanism due to food buildup can often be fixed with deep cleaning or light DIY lubrication. |
If internal switch mechanisms are damaged beyond cleaning or part replacement, availability is limited. |
|
Motor Failure |
Rarely cost-effective to repair unless covered under warranty. |
Dead motor or faulty circuit board repairs ($70–$150) often exceed the cost of a new unit ($80–$120). |
|
Housing Damage |
Minor cosmetic wear does not require replacement. |
Cracked or leaking housing poses safety risks; replacement parts are often unavailable. |
|
Internal Bearings |
Not typically repairable individually. |
Grinding noise or rusty residue indicates sealed bearing failure; full replacement is recommended. |
If multiple KitchenAid immersion blender parts fail simultaneously, purchasing a new unit is often more economical than sourcing individual blender replacement parts.
Maintenance Tips to Prevent Future Immersion Blender Issues
Proper maintenance is the most effective way to extend the lifespan of your KitchenAid immersion blender and avoid common mechanical failures like motor burnout or stripped couplers.
Essential Cleaning Habits: Keeping your immersion blender clean after every use helps prevent food buildup, reduces strain on the motor, and keeps it working efficiently.
-
Immediate Rinsing: Rinse the blending arm under warm water immediately after use to prevent food from drying and hardening on the blades, which can strain the motor during the next use.
-
The "Soap Whirl" Method: For a quick, deep clean, fill a tall container with warm, soapy water and run the blender for 10–20 seconds.
-
Wipe, Don't Soak: Never submerge the motor body (handle) in water. Use a damp cloth to wipe away splashes and a cotton swab for grime around the buttons.
Smart Operation Techniques: Using the blender the right way—like blending in short bursts and starting at low speed—protects the motor and prevents overheating.
-
Layer Ingredients: Always add liquids first, followed by soft foods, and place hard or frozen items on top to ensure the blades can start spinning without immediate resistance.
-
Avoid Overloading: Do not exceed the maximum fill line on your blending jar. Overfilling restricts airflow and causes the motor to work harder, leading to overheating.
-
Use the Pulse Strategy: Instead of running the motor continuously, use short 3–5 second bursts followed by brief pauses. Never run the unit for more than 60 seconds at a time.
-
Start Slow: Begin at a low speed to break up large chunks before gradually increasing to higher speeds.
Storage and Long-Term Care: Proper drying, careful cord handling, and regular inspection help extend the life of your blender and avoid costly repairs later.
-
Dry Completely: Ensure the blending arm and blade assembly are bone-dry before reattaching them to the motor body to prevent rust and electrical issues.
-
Cord Care: Avoid wrapping the power cord tightly around the motor body, as this can cause internal wiring to fray or crack over time.
-
Monthly Inspection: Check the drive coupler and blade assembly for any wiggles or unusual noises. Addressing a loose part early can prevent a total motor failure later.
Explore how to keep your commercial blender blades sharp, which covers simple maintenance and sharpening tips to maintain peak blending performance.
Summary: Keep Your KitchenAid Immersion Blender Running Like New
Preventive care is the most effective way to avoid performance issues and extend the lifespan of your KitchenAid immersion blender. Consistent maintenance, such as rinsing the blending arm immediately after use and operating in short pulsed bursts, reduces motor strain and prevents premature wear. Identifying early warning signs like a stripped drive coupler or a tripped thermal protector allows you to resolve minor issues before they escalate into costly repairs or full replacements. Proper storage and careful handling further protect internal and external components.
Key Takeaways:
-
Regularly rinsing the blending arm after use prevents hardened food buildup that can strain the motor during future operation.
-
Using short pulse bursts instead of continuous blending minimizes overheating and protects internal motor components.
-
Addressing early signs like unusual noise or reduced power helps prevent major mechanical failures.
-
Drying all parts thoroughly before reassembly reduces the risk of rust and electrical damage.
-
Storing the unit with a loosely wrapped cord prevents internal wiring stress and long-term structural wear.
FAQs
Can KitchenAid immersion blender go in the dishwasher?
Most KitchenAid immersion blender blending arms and attachments are dishwasher-safe (top rack recommended), but the motor body should never be submerged or placed in the dishwasher. Always check your specific model’s manual for confirmation.
How many watts is the KitchenAid immersion blender?
KitchenAid immersion blenders typically range from 180 to 300 watts, depending on the model. Higher-wattage versions provide better performance for thicker ingredients and heavy-duty blending.
Why does my KitchenAid blender keep shutting down?
Frequent shutdowns are usually caused by overheating or a tripped thermal overload protector. This happens when the motor is overworked, such as blending thick mixtures for too long without breaks.
How to reset a KitchenAid blender?
Most models reset automatically after cooling down. Unplug the unit, wait 15–30 minutes, then reconnect and try again. If it still won’t start, the issue may require professional inspection.
|
Disclaimer: This blog is for general informational purposes only. Troubleshooting steps for KitchenAid immersion blender issues may vary by model and usage. Always consult the user manual and follow manufacturer's guidelines before attempting any repairs or maintenance. |